
How to Build an IBC Wicking Bed: A Step-by-Step Guide for Thriving Gardens
Building a wicking bed is one of the most efficient ways to grow healthy, resilient plants with minimal water usage. An IBC wicking bed—a bed made from a repurposed Intermediate Bulk Container—is perfect for anyone looking to create a self-watering garden bed that is low-maintenance and water-efficient. This guide will walk you through the steps to build your own IBC wicking bed, including tips for finding a quality IBC container.

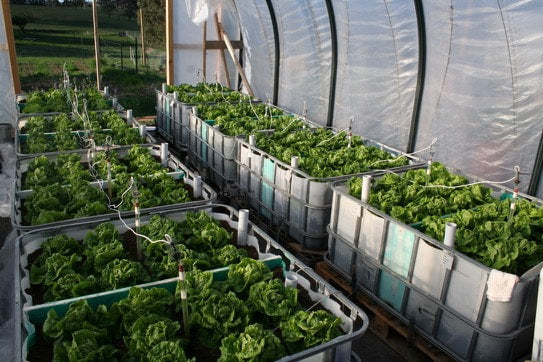
What is an IBC Wicking Bed?
An IBC wicking bed is a raised garden bed constructed from a modified IBC container. These containers are widely used in industries for bulk storage and transport of liquids, and they make ideal bases for wicking beds due to their durable design and ample volume. A wicking bed is a self-watering system where water is stored at the base of the bed, allowing plant roots to “wick” water up as needed, promoting healthier growth and reducing water usage.

Step-by-Step Guide to Building an IBC Wicking Bed
Materials Needed:
- One IBC container (1000-litre capacity recommended)
- Shaded cloth or landscape fabric
- PVC pipe (1.5m length) for filling
- Flexible pipe or drainage pipe (20-30 cm)
- Scoria or gravel (for the wicking layer)
- Soil or organic growing medium
- Geo-textile fabric or shade cloth (to separate soil from gravel layer)
- Drainage tap or outlet (optional but recommended)
Step 1: Preparing the IBC Container
-
Clean and Cut: Clean your IBC container thoroughly to remove any residues. If it previously held chemicals, ensure it is fully washed out and non-toxic. Using a reciprocating saw or jigsaw, cut the container in half horizontally; the bottom half will serve as the bed.
-
Add Drainage Tap: If your container does not already have one, install a drainage tap about 10-15 cm from the bottom. This will allow you to control water levels and drain excess when necessary.
Step 2: Create the Water Reservoir
-
Lay Down the Wicking Layer: Pour a layer of scoria or gravel about 10-15 cm deep at the bottom of the container. This layer serves as the water reservoir, which holds water to feed the plants over time.
-
Install the Overflow Pipe: Drill a small hole slightly above the gravel layer and insert the overflow pipe. This prevents the bed from flooding by letting excess water out, keeping the water level just below the soil layer.
Step 3: Insert the Fill Pipe
Place the PVC fill pipe vertically in one corner, with one end resting in the gravel layer. This pipe allows you to add water directly into the reservoir without disturbing the soil or plants. For easier watering, consider adding a cap or cover on the open end to keep out debris.
Step 4: Add the Separation Layer
Lay geo-textile fabric or shade cloth over the gravel layer. This barrier keeps soil from sinking into the gravel, allowing roots to access water through wicking while preventing clogging. Make sure it covers the entire surface, trimming excess fabric if necessary.
Step 5: Add the Soil Layer
Pour your soil or organic growing medium on top of the separation layer, filling the container to the top. Choose a high-quality, nutrient-rich soil mix, as wicking beds retain moisture and can sometimes reduce nutrient availability over time.
Step 6: Fill and Test the Bed
Add water through the fill pipe until the reservoir is full, then monitor the soil over the next few days to see how it absorbs water. You can adjust the water level if needed by draining or refilling. Once the soil is ready, plant your seedlings or seeds!
Where to Find an IBC Container
IBC containers are widely available through industrial suppliers, agricultural stores, and recycling facilities. Here are some places to start your search:
-
Local Industrial Suppliers: Many IBC containers are originally used in food processing, agriculture, and manufacturing. Check with local suppliers who may sell or recycle used containers.
-
Online Marketplaces: Websites like eBay, Facebook Marketplace, and Gumtree often have listings for secondhand IBCs. Look for sellers who specify food-grade containers if you’ll be growing edible plants.
-
Recycling Centres: Some recycling facilities handle IBC containers. Call ahead to ask if they have any available and if they’ve been used for food or non-toxic materials.
-
Agricultural or Farm Supply Stores: Some farm stores sell new or used IBC containers, often at a premium but with the reassurance that they’re in good condition and may even be cleaned for gardening use.
Caring for Your IBC Wicking Bed
Once set up, an IBC wicking bed requires little maintenance:
- Water Weekly: During warm weather, check the fill pipe once a week to ensure the reservoir is full.
- Monitor Soil Nutrients: Over time, you may need to add compost or fertiliser to replenish nutrients, as wicking beds can be nutrient-intensive.
- Drain and Refill Seasonally: At the end of each growing season, consider draining and flushing the bed to prevent nutrient buildup and keep the system fresh.
Building an IBC wicking bed is a fantastic way to conserve water and grow healthy plants with minimal maintenance. By sourcing an IBC container and following these simple steps, you’ll have a sustainable, productive garden bed that’s perfect for any growing season. So, gather your supplies and get ready to see the benefits of wicking firsthand!